-
How to register at newsclub.co.in लेखक के रूप में पंजीयन केसे करे ?
Registration on newsclub.co.in as a writer is a simple process. Newsclub.co.in पर लेखक के रूप में पंजीयन करने का साधारण तरीका है.
- Click on the Register tab | गोले में दर्शाये गये Register पर क्लिक करे

- Fill up a small registration form. All the fields in the form are mandatory. Please enter correct information about yourself. After filling the form, click on the register tab to submit your application. रजिस्ट्रेशन फॉर्म की प्रत्येक सूचना सही सही भरे और फिर नीचे Register पर क्लिक करे .
- A verification email would be sent on the email id mentioned by you to confirm the authenticity of your details. Click on the verification link received in your mail box to complete the registration process. Register पर क्लिक करने के बाद, आपके ईमेल पर एक वेरिफिकेशन लिंक आयेगा. आपके ईमेल अकाउंट में आये वेरिफिकेशन मेल में आये लिंक पर क्लिक करते ही आपका रजिस्ट्रेशन पूरा हो जाएगा.
- And you are done! Now you are a worthy member of newsclub.co.in entitled to write as many news / posts / articles or any other information you want people to read. एक बार रजिस्ट्रेशन होने के बाद, आप newsclub.co.in के माननीय सदस्य है तथा अब कोई भी न्यूज़ / लेख या रिपोर्ट लिख सकते है.
- Click on the Register tab | गोले में दर्शाये गये Register पर क्लिक करे
-
How to write news / posts / articles न्यूज़ / पोस्ट / लेख केसे लिखना ?
To write on newsclub.co.in first you need to register yourself. Once the registration process is complete you can start to write on newsclub.co.in लेखक अपने आप को रजिस्टर करने के बाद ही लिख सकेगा.
- Login at newsclub.co.in with your email id and password specified at the time of registration.

ऊपर दर्शाए गए Login पर क्लिक कर, आपके ईमेल आई डी व पासवर्ड टाइप कर लोग-इन करे. - To write news, select the option of News from left hand side panel (in newly opened page) and then select the option of Write News from sub menu. नए खुले पेज के बाये पेनल पर News पर क्लिक करने के बाद Write News को सेलेक्ट करे.

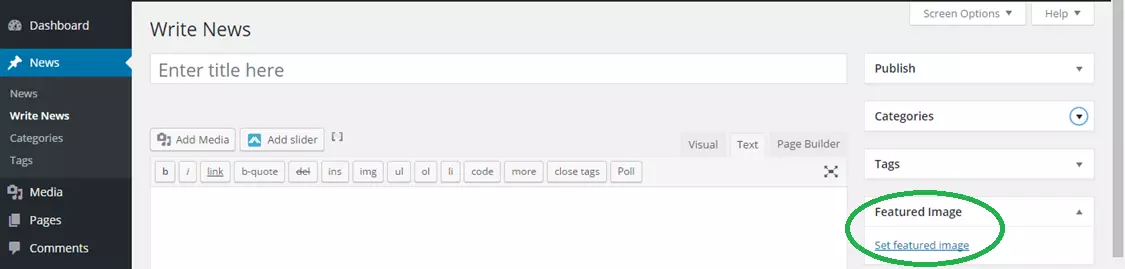
- The first step to write news is to enter a title of News / Report (at …..Enter title here as shown below ) with which you want your news / report to be published. सबसे पहले ‘Enter title here’ के स्थान पर न्यूज़ का शीर्षक टाइप करे.
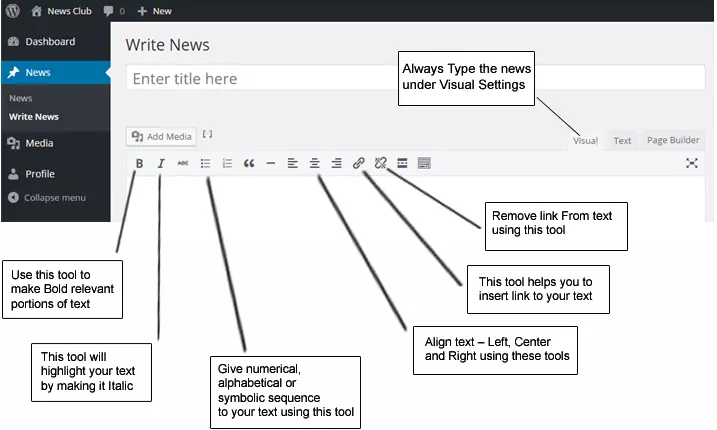
- Start writing the news in the Text Box below Title Box. You can also write in Hindi language using the Google Input Tool. Certain features can be added to your text as explained below. नीचे दर्शाए गए शोर्टकट निशानों का उपयोग करते हुए शीर्षक बॉक्स Title Box के नीचे उपलब्ध खाली स्थान Text Box पर अंगरेजी / हिदी में टाइप करना प्रारम्भ करे-
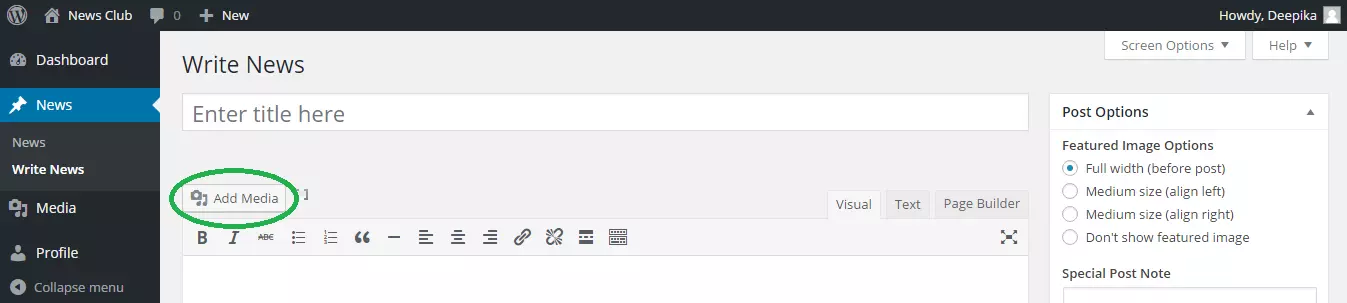
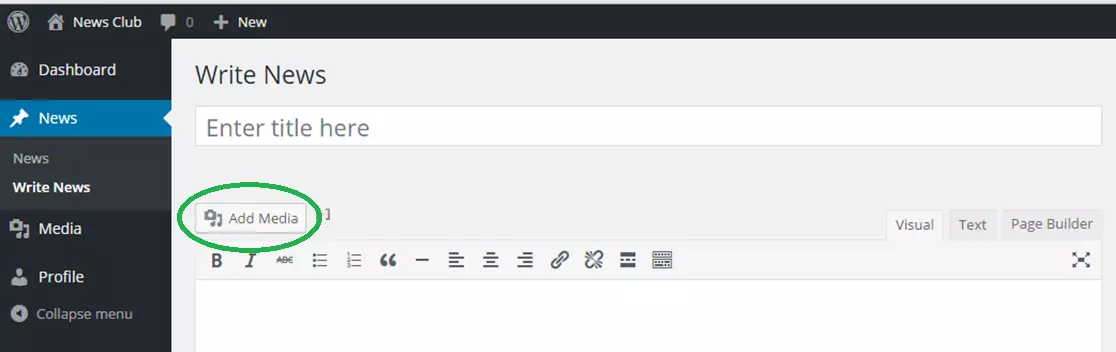
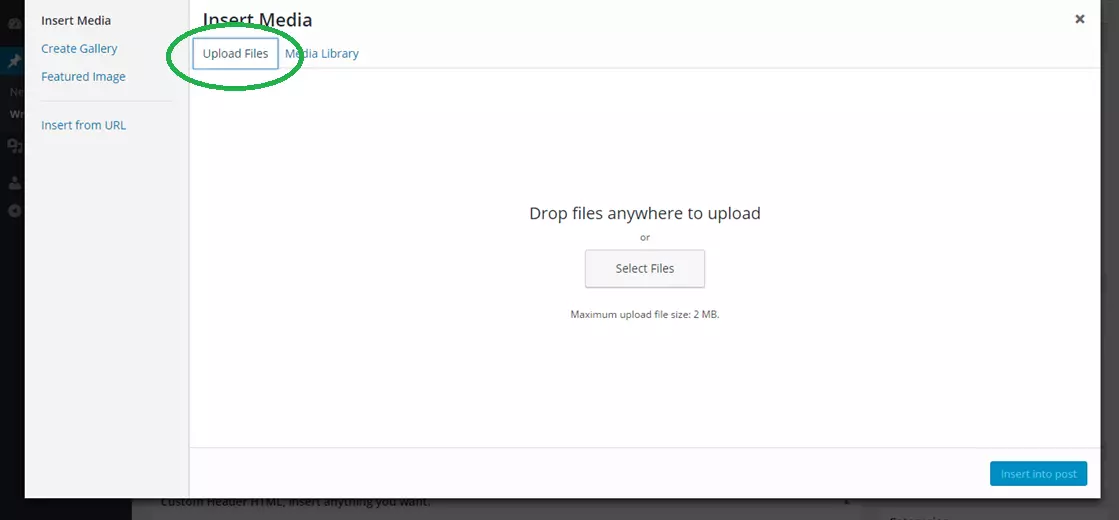
- You can also add images and videos to your news using the ‘Add Media’ feature in support of and for value addition. Place the cursor at the point on the writing page where you want to insert media (Photo / Video / Audio). And then Check/ Select option of ‘ Add Media ‘. आप अपनी न्यूज़ / रिपोर्ट / लेख के समर्थन में व उसकी विश्वसनीयता के लिए फोटो / विडियो / ऑडियो भी जोड़ सकते है. इसके लिए आप पेज पर जहा पर भी फोटो / विडियो / ऑडियो अपलोड करना चाहे, उस जगह पर करसर (माउस) को ले जाये और नीचे दर्शाए गए ‘ Add Media ‘ पर क्लिक करे.
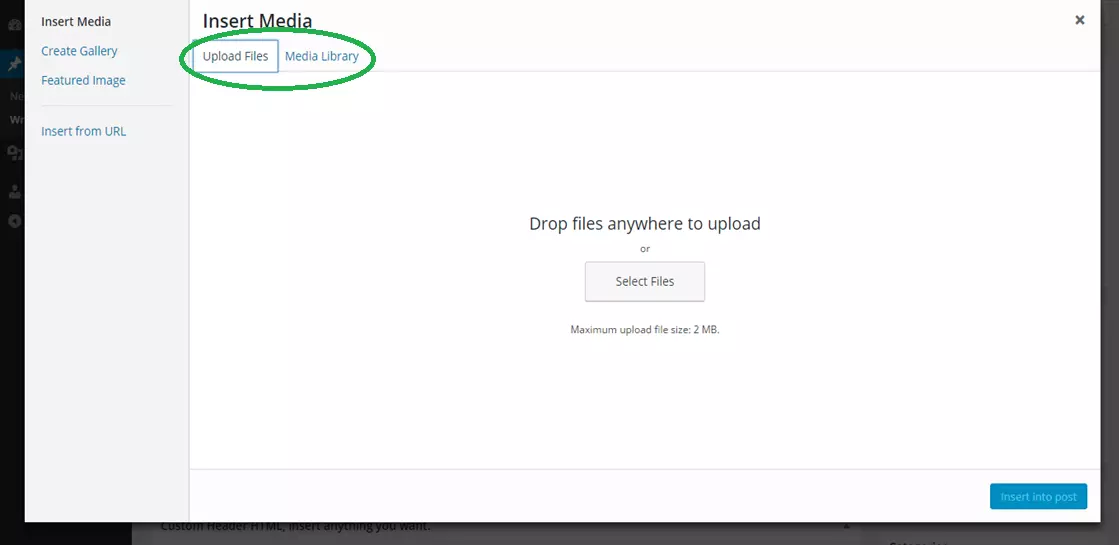
- Upload files if the image or video you want to add is not already in the media library. Maximum size of file for upload is restricted to 2 MB. Make sure your file is under the limit for successful uploading. ‘ Add Media ‘ पर क्लिक करने के बाद आपके सामने दो ऑप्शन में से Media Library का आप्शन खुला देखेगा जिसमे दिखेंगे आपकी सारी पुरानी फाइल्स दिखेगी. यदि पुरानी फाइल्स में से अपलोड नहीं करना है तो Select files पर क्लिक करे. यदि पुरानी फाइल्स में से ही फोटो आदि लेना है तो Drop Files का आप्शन सेलेक्ट करे.
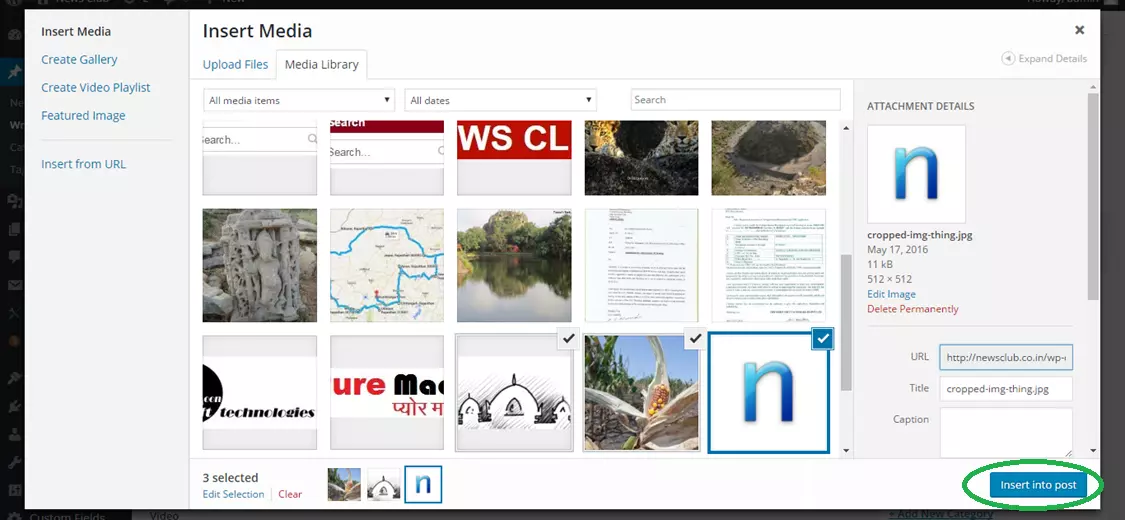
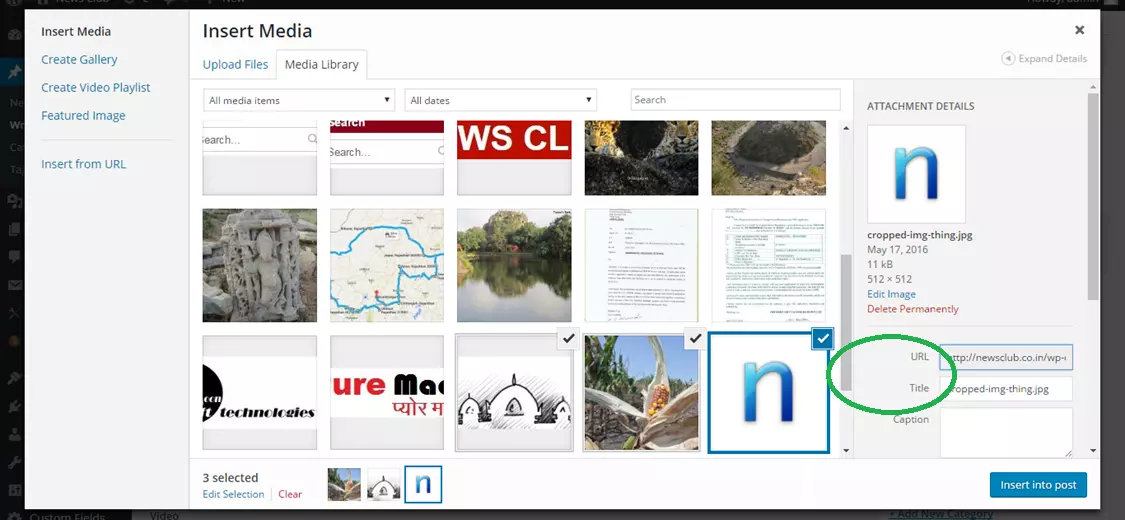
- Once the media file is uploaded select the files you want to add (more than 1 file can be added at a time) and click on Insert into Post tab. एक बार आपकी मीडिया फाइल अपलोड हो गयी है, फाइल सेलेक्ट कर Post बटन पर क्लिक करे.
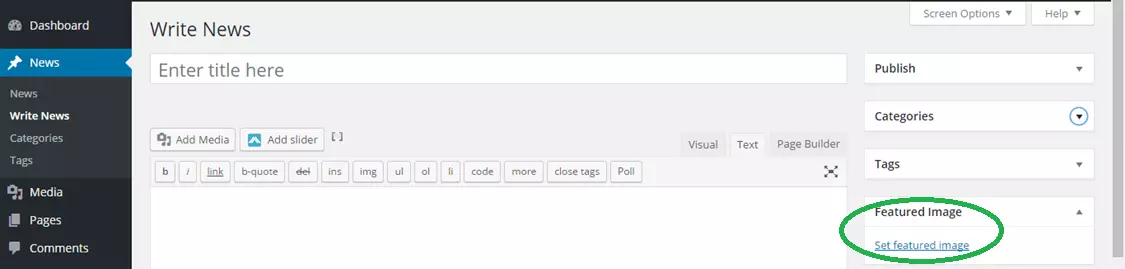
- By default your first uploaded photo in the post shall become the featured photo for the post which will be reflected on Home page of the website. You can change the featured image using the option of ‘Set Featured Image‘on the left hand side panel. आपके द्वारा अपलोड किया गया पहला फोटो आपका फीचर्ड फोटो होगा जो होम पेज पर सभी जगह प्रदर्शित होगा जबकि खबर के साथ सभी फोटो प्रकाशित होगी.
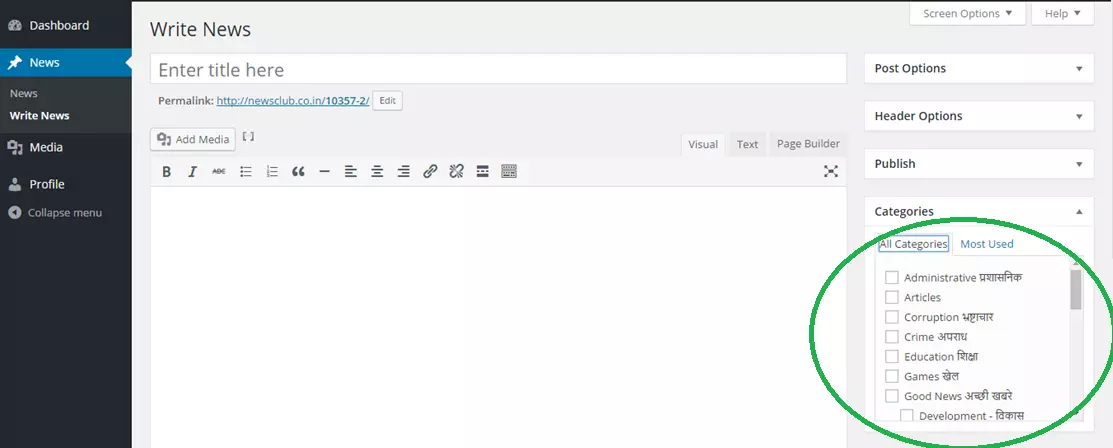
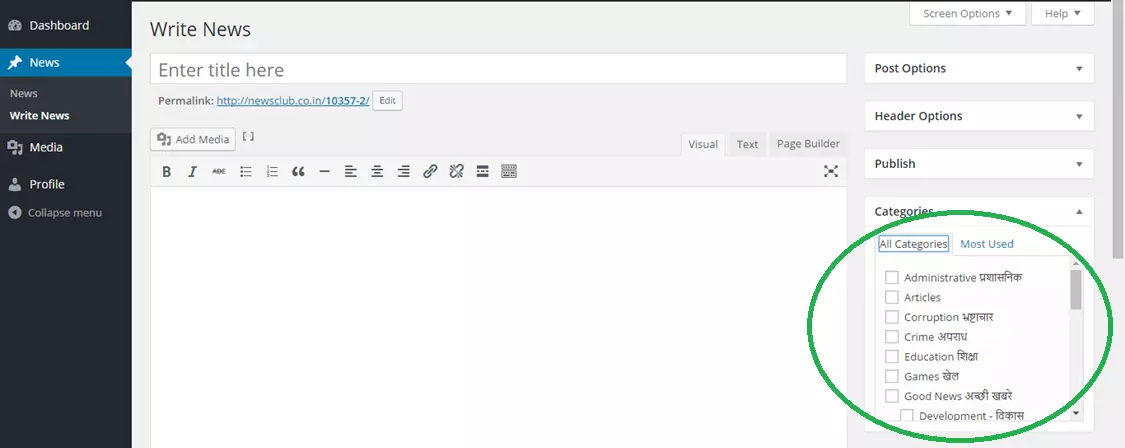
- When your news is ready with media and text, select the category under which you want your news to be seen. A list of various categories is given on the right hand side panel. You can select more than 1 category for your post. For major category like Politics, Good News , Others, please select both major as well as sub category. आपकी न्यूज़ / लेख / रिपोर्ट हर तरह से तैयार है तो अब आपको न्यूज़ / लेख / रिपोर्ट के केटेगरी (विषय) नीचे दाहिनी तरफ दिख रही सूची में से एक या अधिक विषय का चयन करना होगा. अन्य की स्थिति में अन्य के साथ साथ उप-विषय (सब-केटेगरी) का भी चयन करे. यदि आपने विषय का चयन नहीं किया तो आपकी न्यूज़ / रिपोर्ट / लेख बिना विषय (Uncategorised) रहेगी जिससे विषयवार खबरों में प्रदर्षित नहीं होगी.
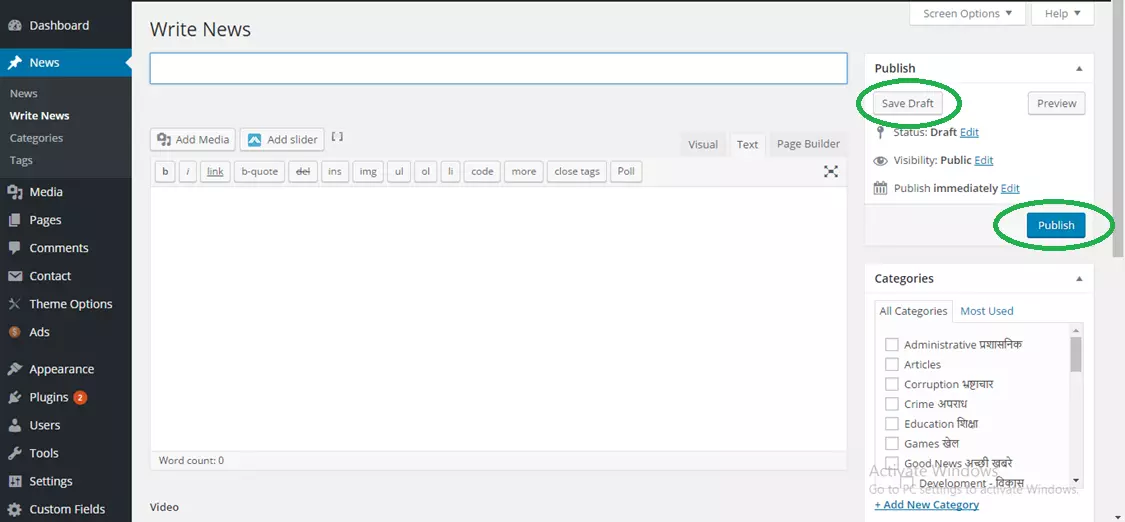
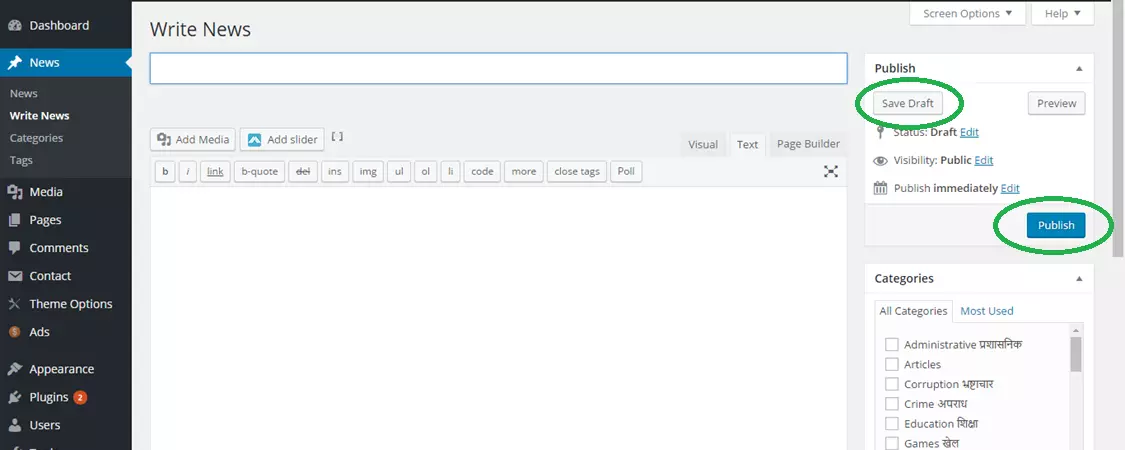
- If you are not satisfied with the completeness of your write-up, you can keep it pending as DRAFT by clicking on ‘SAVE DRAFT’. If you are done with your post / news click on ‘Publish‘ for final publication. यदि आप अपनी न्यूज़ / रिपोर्ट की पूर्णता से संतुष्ट नहीं है तो आप on ‘ SAVE DRAFT’ पर क्लिक करके अपनी तैयार सामग्री के ड्राफ्ट को सेव कर सकते है. यदि आप अपनी तैयारी से संतुष्ट है तो ‘ Publish ‘ पर क्लिक कर आप अपनी न्यूज़ / रिपोर्ट को प्रकाशित करे.
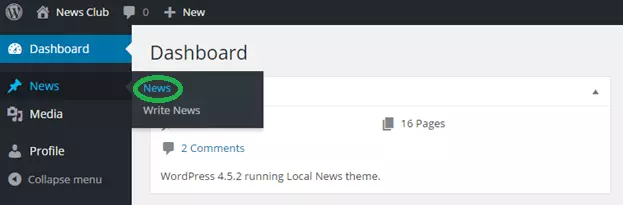
- You can any time view your News on left hand side panel of your ‘ DASH BOARD ‘ by clicking on ‘ News ‘ and you can write new News by clicking on ‘Write News’ . आप अपनी प्रकाशित सामग्री अपने ‘ DASH BOARD ‘ की बाई तरफ की पेनल पर News पर क्लिक करके कभी भी पढ़ सकते है तथा ‘Write News’ पर क्लिक करके नई न्यूज़ / रिपोर्ट / लेख लिख सकते है.

- News once published cannot be edited by the writer. Admin reserves the rights to edit or delete the news once published. एक बार न्यूज़ / रिपोर्ट / लेख प्रकाशित हो जाने के बाद लेखक इसमें कोई परिवर्तन नहीं कर सकता. हालाकि वेबसाइट का प्रशासक (एडमिन) किसी भी न्यूज़ / रिपोर्ट / लेख के प्रकाशन से पहले या बाद में उसमें सम्पादन / सुधार कर सकता है या पूरी न्यूज़ / रिपोर्ट / लेख को हटा सकता है. साधारणतया वेबसाइट का प्रशासक (एडमिन) किसी भी न्यूज़ / रिपोर्ट / लेख के प्रकाशन से पहले या बाद में उसमें सुधार या सम्पादन कही करेगा.
- Login at newsclub.co.in with your email id and password specified at the time of registration.
-
How to add image or video in the post?
- You can add images and videos to your news using the ‘Add Media’ feature in support of and for value addition. Place the cursor at the point on the writing page where you want to insert media (Photo / Video / Audio). And then Check/ Select option of ‘Add Media ‘. आप अपनी न्यूज़ / रिपोर्ट / लेख के समर्थन में व उसकी विश्वसनीयता के लिए फोटो / विडियो / ऑडियो भी जोड़ सकते है. इसके लिए आप पेज पर जहा पर भी फोटो / विडियो / ऑडियो अपलोड करना चाहे, उस जगह पर करसर (माउस) को ले जाये और नीचे दर्शाए गए ‘ Add Media ‘ पर क्लिक करे.

- Upload files if the image or video you want to add is not already in the media library. Maximum size of file for upload is restricted to 2 MB. Make sure your file is under the limit for successful uploading. ‘ Add Media ‘ पर क्लिक करने के बाद आपके सामने दो आप्शन में से Media Library का आप्शन खुला देखेगा जिसमे दिखेंगे आपकी सारी पुरानी फाइल्स दिखेगी. यदि पुरानी फाइल्स में से अपलोड नहीं करना है तो Select files पर क्लिक करे. यदि पुरानी फाइल्स में से ही फोटो आदि लेना है तो Drop Files का आप्शन सेलेक्ट करे.
- Once the media file is uploaded select the files you want to add (more than 1 file can be added at a time) and click on Insert into Post tab. एक फोटो अपलोड करने के बाद, आवश्यकता हो तो आप और फोटो ( यानिकी एक से ज्यादा) अपलोड कर सकते है.
- By default your first uploaded photo in the post shall become the featured photo for the post which will be reflected on Home page of the website. You can change the featured image using the option of ‘Set Featured Image‘on the left hand side panel. आपके द्वारा अपलोड किया गया पहला फोटो आपका फीचर्ड फोटो होगा जो होम पेज पर सभी जगह प्रदर्शित होगा जबकि खबर के साथ सभी फोटो प्रकाशित होगी.
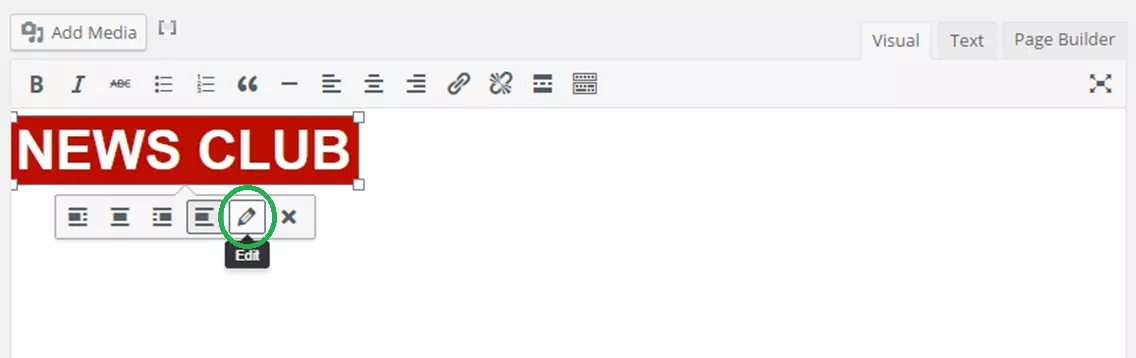
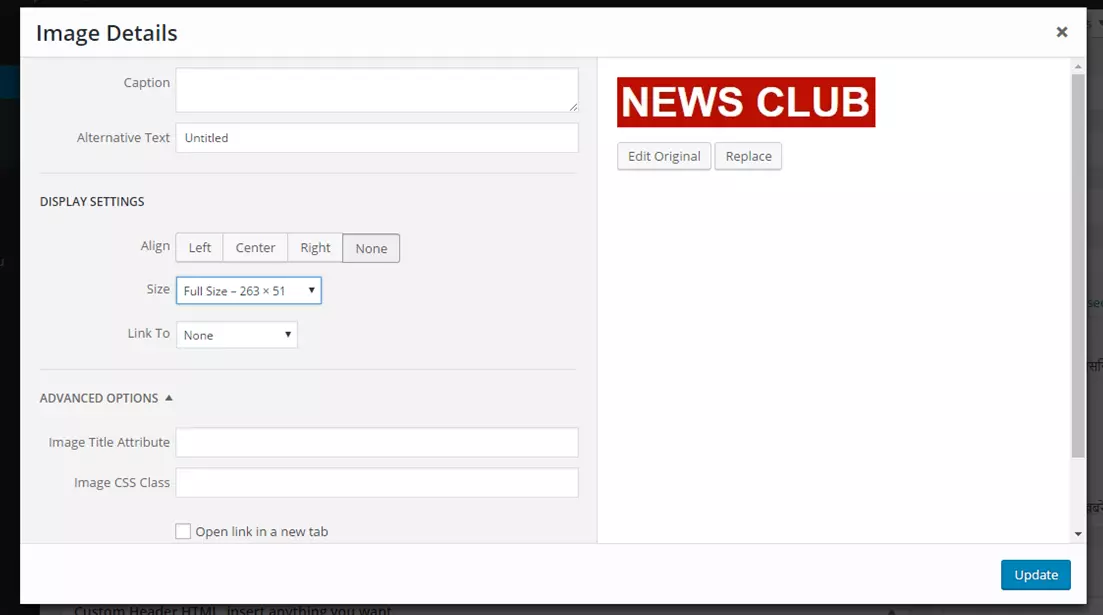
- You can modify the look of your media by changing size, changing alignment, adding caption or linking the media file. All these options are available when you click on the media file. आप अपनी फोटो का लुक भी थोड़ा बदल सकते है. कई ओप्तिओंस उपलब्ध है.
- You can add images and videos to your news using the ‘Add Media’ feature in support of and for value addition. Place the cursor at the point on the writing page where you want to insert media (Photo / Video / Audio). And then Check/ Select option of ‘Add Media ‘. आप अपनी न्यूज़ / रिपोर्ट / लेख के समर्थन में व उसकी विश्वसनीयता के लिए फोटो / विडियो / ऑडियो भी जोड़ सकते है. इसके लिए आप पेज पर जहा पर भी फोटो / विडियो / ऑडियो अपलोड करना चाहे, उस जगह पर करसर (माउस) को ले जाये और नीचे दर्शाए गए ‘ Add Media ‘ पर क्लिक करे.
-
How to classify my news under a particular category?
- Make sure to select a category under which you want your post / news to be published. A list of various categories is given on the right hand side panel. You can select more than 1 category for your post. आपकी न्यूज़ / लेख / रिपोर्ट हर तरह से तैयार है तो अब आपको न्यूज़ / लेख / रिपोर्ट के केटेगरी (विषय) नीचे दाहिनी तरफ दिख रही सूची में से एक या अधिक विषय का चयन करना होगा. अन्य की स्थिति में अन्य के साथ साथ उप-विषय (सब-केटेगरी) का भी चयन करे. यदि आपने विषय का चयन नहीं किया तो आपकी न्यूज़ / रिपोर्ट / लेख बिना विषय (Uncategorised) रहेगी जिससे विषयवार खबरों में प्रदर्षित नहीं होगी.
For major categories like Politics, Good News and Others, also select sub category. For example, if you select Politics as the category of news, also select sub category i.e. National or State or Local.
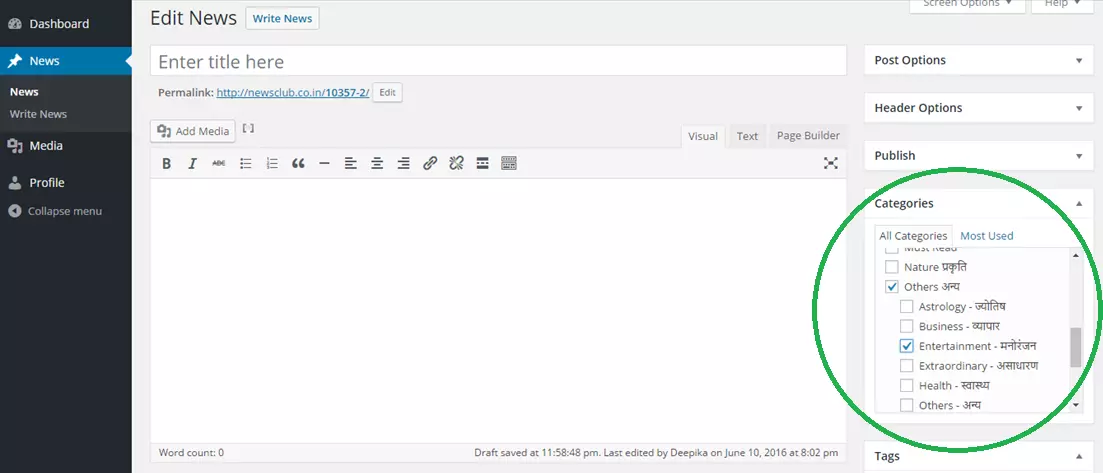
- Make sure to select a category under which you want your post / news to be published. A list of various categories is given on the right hand side panel. You can select more than 1 category for your post. आपकी न्यूज़ / लेख / रिपोर्ट हर तरह से तैयार है तो अब आपको न्यूज़ / लेख / रिपोर्ट के केटेगरी (विषय) नीचे दाहिनी तरफ दिख रही सूची में से एक या अधिक विषय का चयन करना होगा. अन्य की स्थिति में अन्य के साथ साथ उप-विषय (सब-केटेगरी) का भी चयन करे. यदि आपने विषय का चयन नहीं किया तो आपकी न्यूज़ / रिपोर्ट / लेख बिना विषय (Uncategorised) रहेगी जिससे विषयवार खबरों में प्रदर्षित नहीं होगी.
-
How to view all the news I have written up till now?
All the news you have written up till now whether it be news published or news draft can be checked by selecting ‘ News ‘ from left hand side panel and then, select News from sub menu. यदि आप अपनी प्रकाशित या ड्राफ्ट में लंबित न्यूज़ / रिपोर्ट / लेख देखना चाहे तो आप कभी भी अपने डैशबोर्ड के पेनल में News पर क्लिक करके देख सकते है बशर्ते एडमिन द्वारा आपकी न्यूज़ हटाई नहीं गयी हो.
-
How to Save News without publishing it?
- You can save the news / post written by you using the ‘Save Draft’ option on the left hand side panel. Whenever you want your news to appear on website, simply click on ‘Publish’ button. Till the finalization, it should / can be kept as Draft. Publish (प्रकाशित) करने से पहले तक आप अपनी सामग्री को Draft में सेव करके रख सकते है.
- Draft News can be edited / deleted by writer. However news once published cannot be edited or deleted by writer. Only Admin reserves such rights. एक बार न्यूज़ / रिपोर्ट / लेख प्रकाशित हो जाने के बाद लेखक इसमें कोई परिवर्तन नहीं कर सकता. हालाकि वेबसाइट का प्रशासक (एडमिन) किसी भी न्यूज़ / रिपोर्ट / लेख के प्रकाशन से पहले या बाद में उसमें सम्पादन / सुधार कर सकता है या पूरी न्यूज़ / रिपोर्ट / लेख को हटा सकता है. साधारणतया वेबसाइट का प्रशासक (एडमिन) किसी भी न्यूज़ / रिपोर्ट / लेख के प्रकाशन से पहले या बाद में उसमें सुधार या सम्पादन कही करेगा.
- You can save the news / post written by you using the ‘Save Draft’ option on the left hand side panel. Whenever you want your news to appear on website, simply click on ‘Publish’ button. Till the finalization, it should / can be kept as Draft. Publish (प्रकाशित) करने से पहले तक आप अपनी सामग्री को Draft में सेव करके रख सकते है.
-
Benefits of honey
-
OPINION POLL
क्या क्रेडिट कोपरेटिव सोसाइटियो द्वारा बहुत उच्ची दर से ब्याज देना व अपने ही सदस्यों की जमाओ पर दलालों को कमीशन देना उचित है ?
- नहीं / No (75%, 6 Votes)
- हां / Yes (25%, 2 Votes)
Total Voters: 8
 Loading ...
- Polls Archive